


In today’s competitive web landscape, site performance and user experience directly impact SEO rankings and conversion rates. Google’s Core Web Vitals – key page speed, responsiveness, and visual stability metrics – are now crucial ranking factors. For Next.js developers and digital agencies, optimizing for Core Web Vitals is essential to ensure fast, smooth websites that rank well and delight users. This comprehensive guide will explain Core Web Vitals and why they matter and provide practical Next.js optimization strategies (with code examples) to improve each metric. We’ll also cover Next. Js-specific performance tools, rendering best practices (SSR/SSG/ISR), dynamic imports, image and font optimization, caching techniques, and real-world examples – empowering beginners and advanced developers to boost Next.js page performance.
What Are Core Web Vitals and Why They Matter
Core Web Vitals are a set of user-centric performance metrics defined by Google to quantify key aspects of user experience on a page. In 2024, the Core Web Vitals consist of three primary metrics:
- Largest Contentful Paint (LCP) – measures loading performance, specifically how long it takes for the most significant content element (e.g., hero image or headline) to render in the viewport.
- First Input Delay (FID) / Interaction to Next Paint (INP) – measures interactivity. FID is the delay before the page responds to the first user interaction, whereas INP (which replaced FID in 2024) gauges overall responsiveness by considering all interactions on a page.
- Cumulative Layout Shift (CLS) – measures visual stability, quantifying how much the page layout shifts unexpectedly (e.g., images or ads causing content jump).
These metrics capture loading speed, responsiveness, and stability – all critical to user experience. Google uses Core Web Vitals as a ranking signal, meaning sites with poor Web Vitals may rank lower in search results. Fast, responsive pages keep users engaged and reduce bounce rates, directly impacting SEO and business success.
Core Web Vitals targets: To provide a good UX (and satisfy Google’s criteria), aim to meet the “good” threshold for each metric:
| Core Web Vital | What it Measures | Good Threshold |
|---|---|---|
| Largest Contentful Paint (LCP) | Loading speed – time to render largest content | ≤ 2.5 seconds |
| First Input Delay (FID) (legacy metric) | Initial interactivity – delay before first user input is processed | ≤ 100 milliseconds |
| Interaction to Next Paint (INP) (replacing FID) | Overall responsiveness – delay for user interactions throughout page | ≤ 200 milliseconds |
| Cumulative Layout Shift (CLS) | Visual stability – sum of unexpected layout shifts | ≤ 0.1 (dimensionless score) |
In the sections below, we’ll break down each Core Web Vital and discuss how Next.js can address these metrics. Next.js is well-equipped for performance – it offers features like automatic code-splitting, server-side rendering, static generation, and built-in image optimization that give developers a head start on Web Vitals (Why Next.js Is the Best Framework for SEO in 2025). However, to truly excel, you’ll need to apply specific techniques for each metric. Let’s dive in.
Optimizing Largest Contentful Paint (LCP) in Next.js
Largest Contentful Paint measures how quickly the main content of your page loads. An LCP under 2.5 seconds is considered good. On a Next.js site, common LCP elements are often large hero images, banners, or prominent text. Slow LCP can occur due to render-blocking resources, unoptimized images, slow server responses, or heavy client-side JavaScript that delays content rendering.
Why LCP matters: A slow LCP means users are left waiting to see the most critical content. This can feel like staring at a blank or incomplete page, leading to frustration. Improving LCP makes the site feel faster and more engaging – users can start consuming content quickly.
Next.js strategies to improve LCP:
- Optimize Images with Next.js < Image>: Large images are frequent LCP elements. Next.js’s built-in next/image component drastically improves image loading. It automatically serves modern formats (WebP/AVIF), generates responsive sizes, and lazy-loads offscreen images. Crucially, Next <Image> sets width and height by default, reserving space to avoid layout shifts. It also uses an optimized loader and CDN caching. Using next/Image for your hero and other large images reduces file size and ensures efficient loading, directly improving LCP. For example:
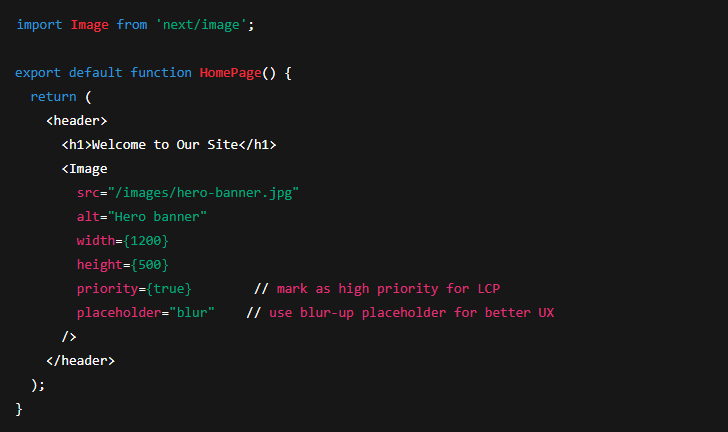
In the code above, the hero image is served via Next.js. We use priority={true} to instruct Next.js to preload this image (important for LCP). Next.js will automatically output optimized <img> markup and preload hints for priority images. The result is a faster LCP, as the browser can quickly fetch and display the hero image. In one case study, optimizing images in a Next.js e-commerce site reduced image payload by 75% and improved LCP by 62% – a massive gain in load performance.
- Server-Side Rendering or Static Generation: Next.js allows you to render pages on the server (SSR) or at build time (SSG). Both techniques can improve LCP by delivering fully or partially rendered HTML to the browser so the user sees primary content sooner. SSR (getServerSideProps) ensures each request gets HTML with content, which can reduce the time to first paint versus a client-rendered approach. SSG (getStaticProps) goes further by pre-building pages; the HTML can be served instantly via CDN, giving blazing-fast LCP for static content. Use static generation for pages like blog posts, marketing pages, or other content that doesn’t need per-request freshness – the CDN delivery will likely yield an LCP well under 2.5s. For dynamic pages that must be up-to-date, SSR is still beneficial for LCP (just be sure to optimize your server response time, which we cover below). Next.js also supports Incremental Static Regeneration (ISR), which lets you serve static pages with periodic revalidation – giving you the best of both worlds (fast static LCP and fresh content).
- Preload Critical Assets: Ensure critical resources (like your main CSS, above-the-fold fonts, or hero image script) are fetched early. You can use <link rel= “preload”> in the <Head> for key assets. Next.js makes this easier with the Head component or by marking images as a priority. For example, to preload a font or essential CSS, add in your _app.js or custom _document.js:
// Inside <Head> in _document.js
<Head>
<link rel=”preload” href=”/fonts/MyFont.woff2″ as=”font” type=”font/woff2″ crossOrigin=”anonymous” />
<link rel=”preload” href=”/css/main.css” as=”style” />
</Head>
Preloading instructs the browser to fetch these files sooner, thereby reducing the delay in rendering critical content. Be selective: preload only files that are crucial for the initial render. Too many preloads can congest the network. Next.js 13’s <Link> component automatically prefetches internal pages when they enter the viewport, and React 18’s streaming feature can also inline some critical chunks. Leverage these to reduce the necessary bytes more quickly for a better LCP.
- Optimize Server Response Times: A fast server response (<~200ms TTFB) helps LCP because the browser can start rendering sooner. Host your Next.js app on a high-performance platform or CDN edge network. Utilizing an edge network (such as Vercel or Cloudflare) brings content closer to users and can significantly reduce latency. Also, optimize any server-side code in API routes or getServerSideProps – slow database queries or calls can delay the delivery of HTML. If using a Node.js server, ensure you enable compression. Next.js enable gzip/Brotli by default in production, with compress: true in next.config.js. A smaller HTML size and faster responses translate to a quicker LCP.
- Minify and Defer Non-Critical JS/CSS: Remove or defer any content not required for above-the-fold elements. Next.js automatically code-splits by route, shipping only the JavaScript needed for that page, and can tree-shake unused code. Still, audit your bundles for bloat. Use the @next/bundle-analyzer plugin to find large modules. Split heavy components with dynamic import (covered in the FID section) so they don’t block the initial render. Additionally, consider loading specific scripts after the paint event occurs. Next.js’s <Script> component, with the strategy set to “afterInteractive” or “lazyOnload,” can be used for third-party scripts (such as analytics) that aren’t needed immediately – this prevents them from delaying LCP. Likewise, minify your CSS and JS and inline critical CSS if necessary. Reducing render-blocking resources ensures the LCP element (e.g., hero section) can render promptly. vercel.com.
- Use Efficient Caching: Caching doesn’t directly speed up first-page LCP for a new visitor, but it dramatically improves repeat visits. Next.js automatically adds optimal caching headers for static assets (JS, CSS, images) and static pages, so returning visitors load much faster from the cache. For SSR pages, you can manually set caching headers to allow CDN or browser to cache the HTML. For example, within getServerSideProps, you might add:
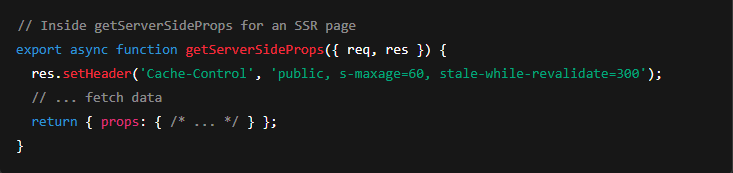
The above sets the page to be cached at the CDN (surrogate) for 60 seconds, with a 5-minute stale-while-revalidate window. This means the first user incurs the full SSR cost, but subsequent users within that window get a cached response (very fast LCP), while Next.js regenerates the page in the background when stale. Caching strategies like this (or using ISR) can dramatically improve LCP and overall speed for high-traffic pages.
In summary, focus on delivering your primary content quickly. Optimize and prioritize images and critical resources, utilize Next.js rendering modes (SSR/SSG) to send HTML faster, and trim away anything that slows down render. By implementing these, your Next.js site’s LCP will improve, giving users a faster first view.
Optimizing First Input Delay (FID) and INP in Next.js
While LCP is about load speed, First Input Delay (FID) and Interaction to Next Paint (INP) are about your site’s responsiveness to user actions. FID measures the delay from a user’s first interaction (like a click) to the time the browser actually responds. A good FID is under 100 ms. INP, which has now replaced FID as of 2024, is more comprehensive: it looks at all interactions a user makes on a page and reports (approximately) the worst delay. A good INP is under 200 ms (meaning even your slowest interaction is reasonably fast).
Why FID/INP matters: If a page loads but then lags or fails to respond promptly to user input, the experience is frustrating. For example, tapping a button and nothing happens for half a second (500ms+) is very noticeable to users. Modern sites often suffer from heavy JavaScript that makes the UI unresponsive – hence Google’s focus on interactivity metrics. Optimizing FID/INP ensures your Next.js site feels snappy and responsive to every tap or click.
Common causes of poor FID/INP in Next.js:
-
Heavy JavaScript execution on load: Next.js apps (being React-based) must hydrate on the client. If the JavaScript bundle is large or contains long-blocking scripts, the browser’s main thread may be busy for seconds, delaying event handling. A long Total Blocking Time (TBT) in Lighthouse often correlates with poor FID.
-
Long-running event handlers or complex logic: If your onClick or other event code runs heavy computations or forced layout reflows, it can delay the next paint.
-
Third-party scripts: Analytics, tag managers, ads, or other third-party scripts can hog the main thread or add latency to interaction readiness.
-
Large re-renders: Updating huge portions of the DOM for a small interaction can cause sluggishness.
Next.js strategies to improve FID/INP:
-
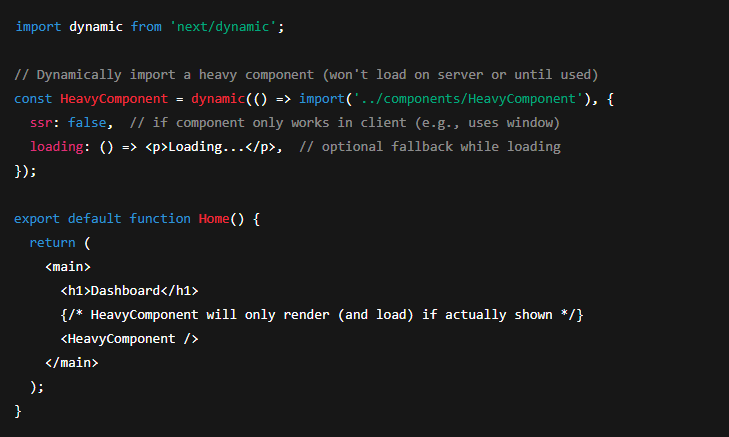
Code-Splitting with Dynamic Imports: This is one of the most effective ways to reduce initial JavaScript load. Next.js supports dynamic import for components, which means you can delay loading non-essential parts of the page until they are needed. By shipping less JS upfront, you shorten the execution time on page load, freeing the main thread sooner for user interactions (improving FID). As a bonus, smaller initial bundles also reduce LCP to some extent. Use
next/dynamicto import heavy components or libraries on the client side only when required. For example:
-
In this snippet, the bundle for
HeavyComponentis split out and will not block the initial render. If the user never scrolls to or interacts with that component, its code never downloads. This “lazy loading” of code drastically cuts down main-thread work on page load. According to best practices, dynamic imports that split code can “be a huge performance boost, especially on mobile devices,” reducing initial load time and bundle size. Aim to dynamically import large UI sections, modals, rich text editors, maps, or any code not immediately needed. This improves both FID (less boot-up JS to parse/execute) and INP (less chance of long tasks during user interactions). -
Minimize Main-Thread Work: Audit and optimize any expensive JavaScript that runs during page load or user interactions. Use Chrome DevTools Performance profile or Lighthouse to identify long tasks. Techniques include:
-
Splitting long tasks into smaller chunks (e.g., using
requestIdleCallbackor yielding to the event loop periodically) so the page remains responsive. -
Removing unnecessary polyfills or heavy libraries. If you included a large library (say moment.js or lodash full build) but use only part of it, consider lighter alternatives or tree-shaking. Every KB of JS can add up.
-
Utilizing Web Workers for non-UI computations. Next.js can offload heavy logic (like data processing) to a Web Worker so the main thread isn’t blocked. This keeps interactions smooth even during data crunching.
-
-
Optimize Event Handling: Review your event handlers for efficiency. Avoid doing too much work on a button click or scroll event. Debounce or throttle frequent events (like window resize or onScroll) so they don’t fire too often. If an interaction triggers a complex state update, ensure you’re not causing large unnecessary re-renders. Use React’s built-in performance optimizations (like
React.memofor heavy child components) to skip re-rendering parts of the UI that didn’t change. -
Leverage React 18 Features (in Next 13+): Next.js 13 with React 18’s concurrent features can improve interaction handling. For example, React’s Transitions (
useTransitionhook) allow you to mark state updates as non-urgent, so user input can be handled first. Also, React 18’s concurrent rendering means background rendering can be interrupted if a high-priority (user input) update comes in, leading to better responsiveness. Next.js’s App Router automatically utilizes React server components and streaming, which reduces the amount of client JS and defers some work to background, improving responsiveness. While you don’t need to use these features explicitly for basic cases, being on the latest Next.js and React can inherently boost your INP by handling updates more intelligently. -
Third-Party Script Management: If you have third-party scripts (analytics, ads, embeds), load them in a way that minimizes impact on interactivity. Next.js provides the
<Script>component where you can setstrategy="lazyOnload"(load script after page load) orstrategy="afterInteractive"(load after initial hydration). For example, Google Analytics can be loaded after interactive so it doesn’t block the main thread during page load. Also, consider using async/defer on any external<script>tags in your custom_document. Reducing the footprint of third-party scripts (or delaying them) will help keep FID low. -
Measure and Monitor: It’s hard to improve what you don’t measure. Use real user monitoring to track FID/INP on your Next.js site. Next.js has a built-in way to report Web Vitals – you can export a
reportWebVitalsfunction in yourpages/_app.jsto send metrics to an analytics endpoint. There are also packages likenext-web-vitalsor simply hooking into Google Analytics 4 which now tracks Web Vitals. Monitoring in the field will reveal if certain pages or interactions are slow. For lab testing, use Lighthouse or WebPageTest to see your Total Blocking Time and any long tasks that could affect FID. By identifying the bottlenecks, you can target the optimizations above where they’re needed most (e.g., maybe a specific page has an expensive component to dynamic-import or a certain script causing issues).
Pro tip: Improving FID and INP often comes down to reducing JavaScript bloat and main-thread blocking. Next.js gives you a head start with automatic code splitting and fast bundlers, but be vigilant about what you add to your app. Keep an eye on your bundle sizes (use next build && next analyze with the bundle analyzer), and avoid the temptation to pack in features that aren’t truly necessary for initial load. By keeping your Next.js app lean and efficiently coded, you’ll ensure interactions are near-instant and your INP stays in the green.
Figure: How Interaction to Next Paint is measured – the total delay from user input through event handling to visual update. Optimizing code can reduce these delays.
An illustration of an interaction timeline: after a user input, the browser must wait for any long tasks (script execution), run event handlers, then update the layout/paint. The sum of these delays is the INP. In Next.js, splitting long tasks and deferring non-critical work helps ensure the user sees a response quickly.
Optimizing Cumulative Layout Shift (CLS) in Next.js
Cumulative Layout Shift measures the sum of all unexpected layout shifts that occur while a page is open. In simpler terms, CLS quantifies how much things jump around on screen (a CLS of 0 means everything is perfectly stable). A CLS score ≤ 0.1 is considered good. Layout shifts usually happen when content is added to the page or resizes after initial render – for example, an image loading without dimensions and suddenly pushing text down, or an ad banner injecting into the top of the page.
A high CLS is frustrating: users might be about to click something and the layout moves, causing a mis-click (ever had a “Click here” button suddenly shift and you click an ad instead? That’s CLS at work!). We want our Next.js pages to be visually stable so users trust the interface and don’t get annoyed by janky movements.
Common causes of CLS and solutions in Next.js:
-
Images without dimensions: If you add an
<img>in HTML without specifying width/height (or CSS dimensions), the browser doesn’t know how much space to allocate until the image loads. This often causes a shift once the image appears. Solution: Always define width and height for images, or use Next.js<Image>which handles this automatically by requiring width/height props. Next’s<Image>component helps “manage layout shifts effectively” by reserving the correct space and even adjusting image quality per device. In practice, just using<Image>for all media eliminates a major source of CLS. Also, enabling placeholder blur or a solid color ensures a smooth image loading experience with no popping. -
Ads, iframes, or dynamic embeds: These elements can inject late or resize. Solution: Allocate static space for them in your layout. If you know an ad slot is 300×250, set a container with that size in CSS so the space is reserved. For responsive embeds, you can use aspect-ratio boxes (e.g., for YouTube iframes, set
padding-topbased on aspect ratio) so the layout doesn’t jump when the content loads. Next.js doesn’t automatically handle third-party embeds, so it’s on you to apply CSS or wrapper elements with fixed dimensions. Also consider using a placeholder or skeleton for content that will load in. -
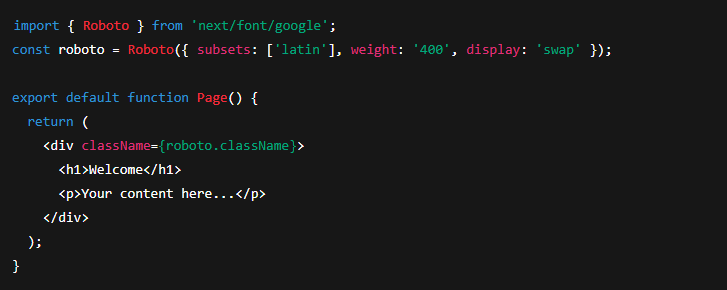
Web font swaps (FOUT/FOIT): Custom web fonts can cause layout shifts – either “Flash of Invisible Text” (FOIT) where text appears late, or “Flash of Unstyled Text” (FOUT) where text re-renders in the new font, possibly changing size. If the font significantly differs from the fallback, it can move text. Solution: Use font loading strategies to minimize shifts. Next.js 13+ introduced the built-in
next/fontmodule which greatly simplifies this. For example, using@next/font/googleto load fonts ensures they are preloaded and that the browser swaps to the font quickly:
-
In this example, the Google Font “Roboto” is loaded with
display: 'swap'by default (which avoids invisible text). Next/font will automatically preload the font and inject the needed CSS, reducing the chance of layout shift when the font loads. If you’re not on Next 13, you can manually addfont-display: swapin your @font-face CSS or preload fonts as shown earlier. The key is to ensure text is visible quickly and the switch from fallback font to custom font doesn’t drastically change metrics (choose fallback fonts similar in size to the web font to minimize reflow). -
Layout shifts on data load/hydration: Sometimes when React hydrates, the content might differ slightly (e.g., a client-only component appears, pushing things). Or if you conditionally render content after fetching data, the page might shift when that data comes in. Solution: Use skeletons or reserved space for content that will load. For example, if you have a user profile box that loads after auth, consider reserving that space with a loading state of the same dimensions. Also avoid inserting new DOM elements at the top of the page unless absolutely necessary; prefer adding below existing content or in a sidebar to avoid pushing main content.
-
CSS tweaks: There are some CSS techniques to help with stability. For example, setting
min-heighton containers can guarantee space. Usingaspect-ratioCSS property on images or videos can reserve space according to a ratio. Additionally, prefer animations that don’t trigger layout changes – e.g., usetransform: translate()instead of changingposition/topfor moving elements, and useopacityfades instead of appearing text that shifts content. If you must do a layout-changing animation or expansion (like an accordion opening), consider using the new CSSoverflow-anchorproperty to neutralize its effect on CLS, or at least do it on user action (CLS only counts unexpected shifts that the user didn’t initiate).
Next.js best practices to ensure low CLS:
-
Use
<Image>for all images (it handles dimension and lazy loading). -
Use
next/fontor proper font loading strategies to avoid text shifts. -
Predefine space for dynamic content (ads, embeds, or later-loaded components).
-
Test your pages. In Chrome DevTools Performance or Lighthouse, enable the layout shift regions overlay – it will highlight what moved. This can help pinpoint the source of CLS. Sometimes a small margin or padding adjustment can fix a jarring shift.
-
Keep an eye on CLS in the field. Google Search Console’s Core Web Vitals report will flag pages with high CLS. Often, fixing one element (like adding an image size or adjusting a CSS load order) can resolve it.
By making your Next.js pages predictable and well-structured in their layout, users will enjoy a steady experience with no surprises. A low CLS not only avoids annoyance, but it conveys polish and reliability – elements stay where they should, and users can interact with confidence.
Next.js Performance Tools, Techniques, and Best Practices
Beyond addressing individual Core Web Vitals, Next.js offers a rich ecosystem and features to boost overall page performance. This section covers additional tools, middleware, and plugins that can help you optimize, as well as best practices for Next.js rendering, caching, and more. These are especially useful for advanced developers and agencies working on larger projects:
-
Analyze and Monitor Performance: Use tools to identify performance bottlenecks in your Next.js app. The
@next/bundle-analyzerplugin can generate an interactive treemap of your webpack bundles – great for spotting unexpectedly large dependencies that you might optimize or remove. For runtime performance, enable Vercel Analytics if you’re hosting on Vercel (it provides real user metrics for Web Vitals). Additionally, leverage Chrome Lighthouse (either via Chrome DevTools or CI tools) to track performance scores over time. For more granular insight, Next.js has built-in Web Vitals reporting: usingreportWebVitalsor theuseReportWebVitalshook, you can log metrics or send them to an analytics service. This helps catch regressions early – for example, if a new library push increased FID, you’d see it in your analytics and can investigate. -
Server-Side vs Static vs Client Rendering – choose wisely: Next.js gives you multiple rendering strategies, and choosing the right one for each page can greatly affect performance:
| Rendering Mode | Characteristics | Performance Impact |
|---|---|---|
| Static Site Generation (SSG) | Page is pre-built as static HTML at build time (using getStaticProps). Ideal for pages with content that updates infrequently (blogs, docs). |
🟢 Excellent performance: HTML served from CDN, near-instant LCP. No SSR cost per request. Core Web Vitals (especially LCP) tend to be very good due to fast delivery. |
| Server-Side Rendering (SSR) | Page is rendered on-demand on the server for each request (using getServerSideProps). Useful for pages that need up-to-the-minute data (user dashboards, personalized content). |
🟡 Good initial load, but depends on server speed: Users get fully rendered HTML (helps FCP/LCP), but each request has server processing latency. Heavier load on server under high traffic. Use caching or upgrade to edge if possible to mitigate latency. |
| Incremental Static Regeneration (ISR) | Hybrid of SSG and SSR: static generation but with the ability to refresh content after a certain interval or on-demand revalidation. | 🟢 Great for performance at scale: Users get mostly static performance (fast LCP), while content stays fairly fresh. Slight staleness trade-off, but overall a win for both speed and content freshness on large sites. |
| Client-Side Rendering (CSR) | Page shell loads and then data is fetched client-side (e.g., using SWR or React hooks) to populate content. Sometimes used for highly dynamic single-page app sections. | 🔴 Lowest initial performance: Initial page might be just a loading spinner – slower LCP and not ideal for SEO. Use CSR sparingly in Next.js (only for parts of the page that absolutely cannot be pre-rendered). Prefer SSR or ISR for better initial UX. |
-
Table: Next.js rendering modes and their performance considerations. In practice, leverage SSG where possible for speed; use SSR when necessary for dynamic data (and then optimize it); mix in ISR for large sites to balance speed and freshness. Avoid full CSR patterns for pages that need to be indexed or fast to first paint.
-
Next.js Middleware and Edge Functions: Middleware in Next.js allows you to run code at the edge (before a request is completed). While middleware is typically used for things like authentication, A/B testing, or geo-based routing, it can indirectly help performance by moving logic closer to the user. For example, using middleware to redirect users to region-specific pages or to serve a lightweight page variant can reduce payload. However, be cautious: heavy middleware logic can also add overhead. Keep middleware lean and leverage caching (the Vercel Edge Network will cache responses if you use
Cache-Control). If you have expensive computations needed on each request, consider using Edge Functions or API Routes with caching rather than doing it client-side – this offloads work from the browser and can improve FID. -
Progressive Web App (PWA) and Offline Caching: Making your Next.js site a PWA can enhance performance for returning visits and poor network conditions. Using a plugin like
next-pwa, you can generate a service worker that caches static assets and pages. This yields near-instant loads from cache on repeat visits and allows offline access. While this doesn’t directly boost first-visit Core Web Vitals, it greatly improves the user experience subsequently, which is especially important for agencies delivering reliably fast sites. Be mindful that stale cached content should be managed (e.g., use service worker strategies that update in background). If implementing a PWA, test that the service worker doesn’t interfere with fresh content delivery or cause any FID delays (generally it shouldn’t, if done right). -
Caching at All Layers: We discussed caching for SSR pages via headers. Also remember to cache data fetching results if possible. Next.js 13’s React server components and new data layer can cache fetch requests automatically (when using the
fetchWeb API in server components, Next will cache them by default unless you opt-out). On older Next or in client-side data fetching, use SWR or React Query to avoid refetching data on every render and to serve cached data instantly. Database queries or expensive calculations ingetServerSidePropscan be memoized or cached in-memory (for example, using LRU cache) if the data doesn’t change every request. Each layer of caching – from CDN to browser to application – contributes to faster response and rendering, improving metrics across the board. -
Compression and Asset Delivery: Ensure you’re taking advantage of modern asset delivery. Next.js will automatically serve Brotli or Gzip compressed assets in production (
compress: trueinnext.config.jsenables this). It also chunks your JavaScript and loads what’s needed. You can further optimize by using HTTP/2 or HTTP/3 on your host (most platforms do this by default now) so multiple assets load in parallel efficiently. Also consider using a CDN for static assets – if not on Vercel, you can configureassetPrefixin Next.config to serve assets from a CDN domain. This reduces load on your server and speeds up delivery. -
Real-world Example – Bringing it All Together: To illustrate how these practices yield results, imagine a Next.js agency project – a marketing site for a client. Initially, the site had an LCP of 4s, FID around 300ms, and CLS 0.25 (not great). After optimization:
-
The team used SSG for most pages and enabled ISR for the blog, pushing LCP down to ~1.5s as content is served from the edge.
-
They refactored heavy components to load dynamically, cutting initial JS by 30%. FID went from 300ms to ~80ms (now passing) because the main thread was free to respond quickly.
-
They replaced all
<img>tags with Next<Image>and addednext/fontfor their custom fonts. CLS dropped to ~0.02 (virtually no layout shift) since images no longer jumped and fonts swapped gracefully. -
Additional gains: they added caching headers for SSR API data and implemented a service worker for offline caching. While not directly measured by Core Web Vitals, these steps made the site feel instant on repeat visits, and Lighthouse Perf scores went from ~50 to ~95.
This example reflects outcomes seen in practice – performance tuning is iterative and multifaceted, but Next.js provides the tools needed at each step to achieve stellar results.
-
-
Performance-Oriented Templates: If you prefer to start with a solid foundation, consider leveraging performance-optimized Next.js templates instead of building from scratch. Some templates are built with best practices in mind (minimal JS, optimized images, clean code). For example, the AffiLiftx Next.js template is specifically crafted for high performance and SEO in affiliate marketing sites (it combines a professional UI with optimized performance for better engagement). Another example is SeaHotel, a premium Next.js hotel website template designed to be lightweight and fast – it emphasizes a stunning design and high-performance, responsive experience for hospitality sites. Starting with a well-optimized template can save you time, as many Core Web Vitals considerations (like proper SSR, image optimization, and caching) are already baked in. Just be sure to verify any template’s claims by testing its Lighthouse scores or checking for use of Next.js best practices under the hood. A quality template from a source like DesignToCodes can jump-start your project with Core Web Vitals in the green from day one.
Conclusion
Optimizing a Next.js website for Core Web Vitals and overall page performance might seem challenging, but it boils down to a clear goal: deliver content fast, make interactions immediate, and keep the experience steady. By focusing on the key metrics – LCP, INP (formerly FID), and CLS – you naturally address the crucial aspects of UX that search engines reward and users appreciate. We explored how Next.js’s capabilities like SSR/SSG, dynamic imports, <Image> and <Font> optimization, and caching can dramatically improve these metrics.
For beginner developers, start with the fundamentals: optimize your images, use Next.js’s built-in tools, and measure your site’s vitals. For advanced developers and agencies, go further by tuning your rendering strategy, analyzing bundles, and employing caching and possibly edge techniques. The effort is worth it – faster Next.js sites have better SEO rankings, higher user engagement, and improved conversion rates.
In summary, Next.js provides an excellent platform for performance if you use it wisely. Apply the practical, code-based tips from this guide: preload and prioritize content for a speedy LCP, cut down JavaScript for a quick INP, and stabilize your layout for a low CLS. Continually monitor your Core Web Vitals in production and iterate. Your reward will be a Next.js website that not only scores high on audits but, more importantly, delights your users with its speed and responsiveness.
By mastering these optimization techniques, you’ll ensure that your Next.js projects – whether a simple blog or a complex web app – are in peak performance health in 2025 and beyond, standing out in both user experience and search engine results.