
Microsoft Excel has become an indispensable tool for professionals and individuals alike. To safeguard your data from unauthorized access and accidental modifications, it’s crucial to learn how to lock Excel spreadsheet with password.
Whether it’s for financial analysis, data management, or planning, Excel provides unmatched versatility. However, with sensitive data and confidential information being stored on spreadsheets, security becomes a top priority.
In this article, we will dive into various methods to secure your valuable data in Excel, ensuring peace of mind and confidentiality.

Understanding the Need for Spreadsheet Security
Before we dive into the technical aspects of locking Excel spreadsheets, let’s take a moment to understand why it is crucial to prioritize data security.
Data breaches and unauthorized access are common threats that can have severe consequences. When working with Excel, you might deal with sensitive financial information, personal records, or confidential business data. If such information falls into the wrong hands, it could lead to financial losses, privacy breaches, and reputational damage.
Locking an Excel spreadsheet is not just about restricting access; it’s about empowering you with control and confidence, knowing that your data is protected from prying eyes and potential threats.
Why Lock Excel Spreadsheets
Protecting Sensitive Data: Protect Data By locking an Excel spreadsheet, you ensure that only authorized personnel can access confidential information, such as financial data or customer details.
Preventing Unwanted Modifications: Locking cells and sheets prevents accidental edits that could lead to errors in calculations or misrepresentation of data.
How to Lock an Excel Spreadsheet: Step-by-Step Guide
Lock spreadsheet with password step by step:
Step 1: Open Your Excel Spreadsheet
To get started, open the Excel spreadsheet you want to secure. If you haven’t created one yet, go ahead and do so now. You can use the latest version of Microsoft Excel for enhanced security features and compatibility.
Step 2: Organize Your Data
Before implementing security measures, ensure your data is well-organized and arranged logically within the spreadsheet. Clear, structured data not only makes it easier for you to manage but also simplifies the locking process.
Step 3: Identify Sensitive Information
Determine which cells, columns, or sheets contain sensitive information that requires protection. This might include financial data, personal identification numbers, confidential formulas, or any other information you want to keep secure.
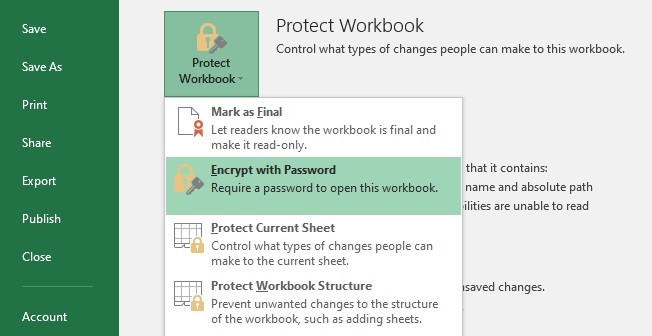
Step 4: Password Protection
One of the most effective ways to lock an Excel spreadsheet is by using a password. Here’s how to do it:
- Click on the “File” tab in Excel, then select “Protect Workbook” from the options.
- Choose “Encrypt with Password” and enter a strong, unique password.
- Save your password-protected spreadsheet.
Remember, use a strong password comprising a mix of uppercase and lowercase letters, numbers, and special characters to Lock Spreadsheet more securely.
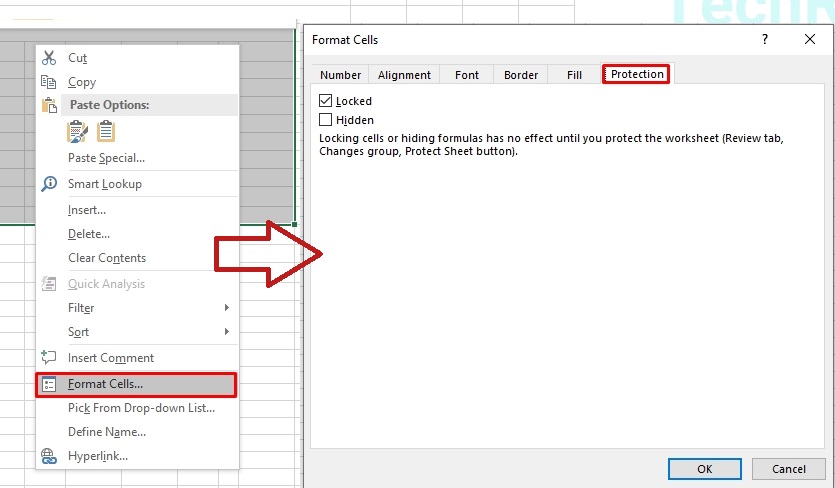
Step 5: Protect Specific Cells
In some cases, you may not want to lock the entire spreadsheet but only specific cells containing sensitive data. To achieve this:
- Highlight the cells you want to protect.
- Right-click and choose “Format Cells.”
- Go to the “Protection” tab and check the “Locked” box.
- Click “OK.”
Now, protect the worksheet by going to the “Review” tab, selecting “Protect Sheet,” and setting a password to prevent any changes to the locked cells.
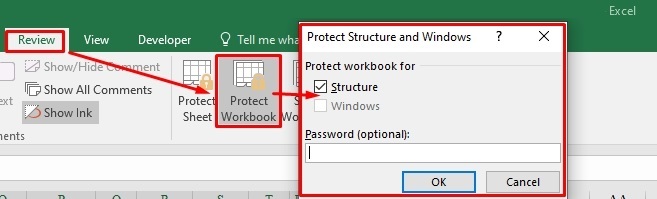
Step 6: Restrict Editing
To further enhance security, you can restrict specific users from editing the spreadsheet entirely. Here’s how:
- Go to the “Review” tab and click on “Protect Workbook.”
- Choose “Protect Structure and Windows” to prevent users from adding, moving, or deleting sheets.
- Set a password to apply the restrictions.
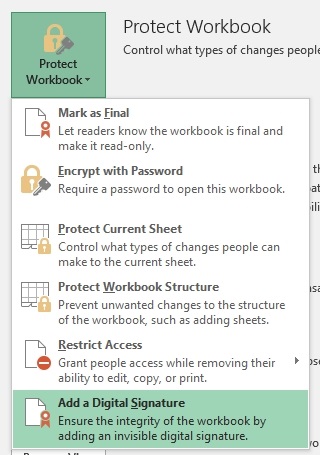
Step 7: Digital Signatures
Digital signatures provide an additional layer of security by verifying the authenticity of the document. By adding a digital signature, you can ensure that the file hasn’t been tampered with since it was signed.
To add a digital signature:
- Go to the “File” tab, select “Protect Workbook,” and then “Add a Digital Signature.”
- Follow the on-screen instructions to create and add your digital signature.
Best Practices for Excel Spreadsheet Security
While knowing how to lock an Excel spreadsheet is essential, following best practices can further bolster your data security. Here are some tips to keep your Excel files safe:
Regular Backups
Frequently back up your Excel spreadsheets to ensure you always have a copy of the data in case of any unforeseen circumstances.
Keep Software Updated
Stay up-to-date with the latest version of Microsoft Excel or other spreadsheet software. Software updates often include security patches to address vulnerabilities.
Be Cautious with External Links
Avoid using external links in your spreadsheets unless necessary. Links to external data can be potential entry points for security breaches.
Limit Access
Restrict access to sensitive spreadsheets to only those individuals who genuinely need it. Implement proper access controls and user permissions.
Use Secure Networks
Ensure that you’re working on a secure and private network when handling confidential Excel files. Public Wi-Fi networks can pose security risks.
Conclusion
In conclusion, protecting your Excel spreadsheets is paramount to safeguarding your valuable data from unauthorized access and potential threats. By following the step-by-step guide provided in this article, you can confidently lock your Excel files and ensure that only authorized individuals have access to sensitive information.
Remember to use strong passwords, restrict editing rights, and consider adding digital signatures for an extra layer of security. Complement these measures with best practices, such as regular backups and software updates, to maintain a robust security posture.
Don’t compromise when it comes to data security. Lock your Excel spreadsheets with confidence and keep your information safe from prying eyes. With these security measures in place, you can rise above potential vulnerabilities and confidently lead in the digital world.